Thursday, January 28, 2016

Peer editing to improve writing

by Kirsten FletcherAnna IzzoCarmen Ruiz-Bergman

Want to know how great teachers encourage great writing? I've encountered some amazing examples in my own department of how to front load instruction and use peer editing to improve students' writing. Check out the different ways you can apply peer editing to your own classes!

Anna Izzo - AP Italian

I overheard Anna Izzo talking about how she was preparing her students to tackle the interpersonal writing section of the AP Italian test. She not only graciously invited me into her class to observe this engaging lesson, but she also wrote the following explanation of her process.

First, students became familiar with the AP rubric.

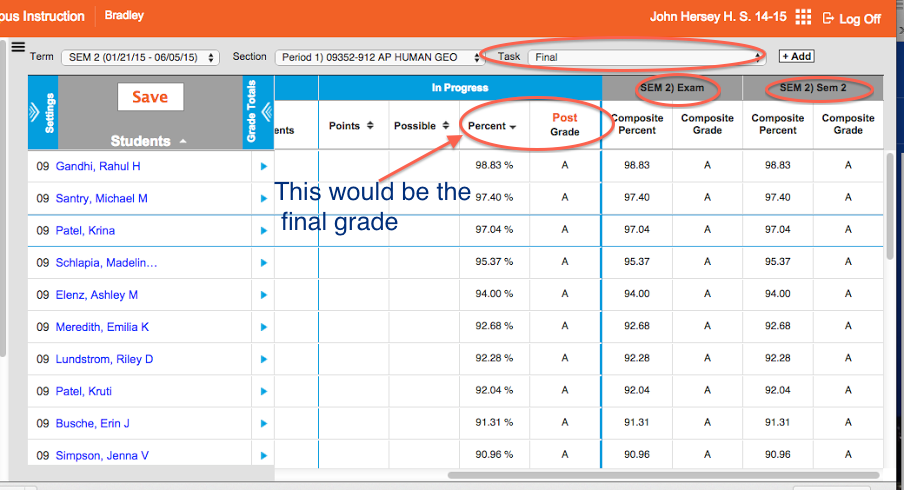
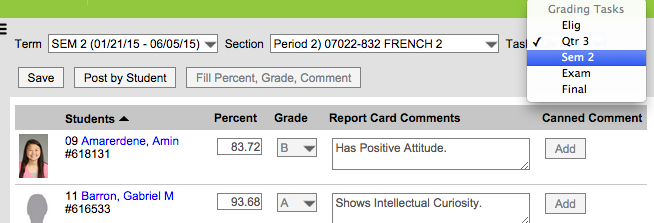
There is a section of the AP test in which students need to write a formal email response.  I decided to take a day for 'email bootcamp;' we started by dissecting the AP rubric and underlining key words.  Then we read the email prompt for the 2013 test and 3 student submissions.  We read the student who received a 5 together and discussed why he or she earned a 5.  Then I gave students 2 more student submissions they had to grade and prove why.   That lead to a great discussion. The next step was now to write their own with a different prompt.


Students evaluate peer writing

The next day we began reviewing some concepts from yesterday.  Then students switched emails with a peer to grade.  In front of them, they each had out the AP rubric and a check list from me.  The checklist is something I've used before; it's simple.  They just have to check for the different parts of the email response that must be included.  For example, is there a formal greeting- yes or no.  After completing the checklist, they then have to give their peer a grade on the AP scale and defend why.


Carmen Ruiz-Bergman - AP Spanish
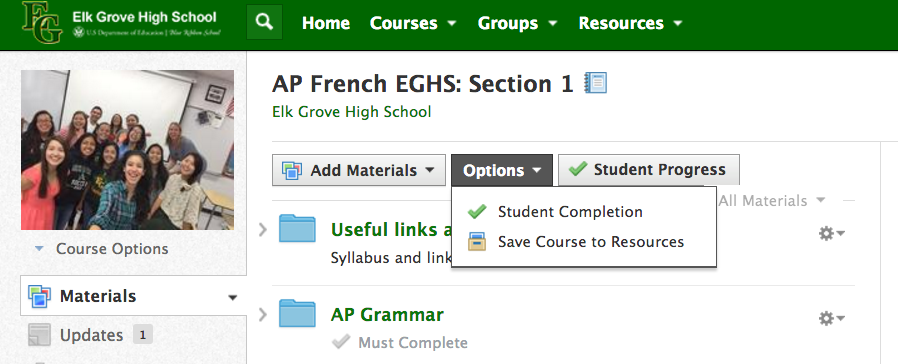
Carmen just presented this idea as a Spark Session at our Teacher-Led Institute Day. (Click here for our blog post containing information and resources from all the Spark Sessions.) She then followed up by leading a Learning Lab. I was impressed with how much time she spent familiarizing her students with the rubric and teaching students to self- and peer-assess prior to ever having them write a formal essay. She said that by front-loading her instruction this way, the end result was a high quality essay that kids were confident about writing.

Carmen credits the idea and some of the resources for her work to another Spanish teacher, SeƱora B, whose blog has an amazing amount of resources for World Language teachers.

The first thing she did was to have students evaluate a writing sample from a past AP Spanish test. She gave students a modified version of the AP rubric, had them read an essay, then try to determine what grade it had received. The discussion surrounding this activity familiarized students with the language of the rubric and with how is should be applied to writing.
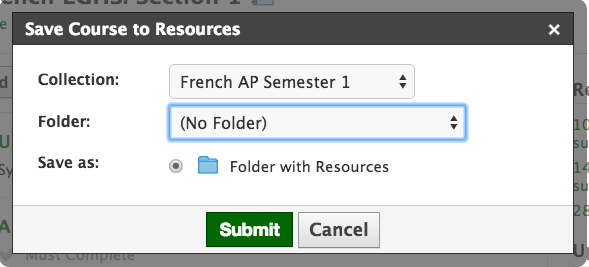
AP Rubric rewritten as a checklist
Peer assessment form
Next, Carmen gave students a practice essay and had them write in class. When finished, before she ever graded the essays, Carmen gave her students a self-assessment worksheet. It contained the same language as the AP rubric, only it was presented in checklist format to make it more user-friendly. First, students assessed their own work. Then they got into groups. On the back of the self-assessment worksheet was a similar checklist, broken into different skills for peer assessment. Students passed their essay to a classmate who evaluated it for only ONE part of the rubric (i.e. task completion, sentence structure, use of texts, etc.) The essay then traveled around the group. Each time, a different student assessed it for a separate skill. In the end, each student received feedback from at least 3 peers. At this point, the teacher had not yet graded a thing, but students had already received meaningful feedback!

Carmen did give her students personalized feedback before they wrote their summative essay. However, she just gave them a checklist with what they needed to improve since they had already received meaningful, descriptive feedback from their peers. On the day of the summative writing assessment, students were allowed to refer to their practice assessment and feedback. The advantages of this approach are many. Students not only reflected on their own work, they also had to think about how the rubric applies to writing. By having multiple peers grade each essay, every student was likely to get at least one set of really quality feedback. Carmen reports that the time spent teaching students to self- and peer-assess was worth it because the essays that she received were much stronger than the previous year.


Schoology Resource Bonanza!

By Linda Ashida

Are you new to Schoology?  Have you started but still have a lot of questions? Do you consider yourself an advanced user?

Well, the amazing resource below has something for everyone to take the next steps with Schoology. A big shout out goes our Technology Coach, Katie Winstead, for curating these resources and organizing them in categories for the beginner, intermediate, and advanced user of Schoology

Check out this link to access the doc!


At our January Institute Day Division Technology Coaches Rachel Barry, Kirsten FletcherMark Heintz, Kim Miklusak and Quinn Loch joined Katie and they facilitated Spark sessions and Learning Labs to share many examples of myriad ways that Schoology can impact student engagement and learning.

Two of our colleagues at Buffalo Grove High School, Danielle Ossman and Laura Heissel, also led sessions on Schoology. Check out  this helpful resource from their session.


We are excited about the collaboration across our schools and we look forward to sharing more examples of the ways that we are engaging students in learning.  Do you have examples to share? Can we help you take next steps?  Come see us in the Collab Lab!

Wednesday, January 27, 2016

Saving Time with Digital Conversion

Written by Quinn Loch

Back in late October, Bruce Janu wrote a great blog post about converting tests/quizzes to blackboard quizzes so they can be imported into Schoology.

The process in a nutshell.

Converting to another type of quiz format using the "Blackboard Quiz Generator" seems like an odd workaround for creating a Schoology quiz, but I assure you that it is a major time saver. It has saved me hours of tedious retyping into Schoology. You can also create True/False, essay, fill in the blank, and matching style questions through the online generator. The only thing that is left out are images, but those can be added in after the import into Schoology.

A couple weeks ago, I helped Melissa Curtis and Jim Arey learn the conversion process so they could convert several exams to Schoology quizzes. This format will make it so meaningful feedback can be given to students much quicker. According to them, they were able to save at least 5 hours of data input by following this conversion process.

On top of importing tests from blackboard, Schoology can also import tests/quizzes from other formats such as Moodle2. Also, ExamView can export tests to Blackboard quizzes, which can then be imported into Schoology - images and all!

It would have taken weeks to create these question banks
 for APES, but conversion saved me countless hours.

The process may seem complex, but it really isn't so bad. If you have any questions about the process or need some guidance, come stop by the Collab Lab!

Monday, January 25, 2016

Teacher-led Institute Days at EG!

By Linda Ashida

Today we carried on our tradition of our teacher-led professional learning with our January Institute Day:  "Making Connections."

We collaborated with our colleagues across all departments to plan Spark sessions and Learning Labs that made connections to our professional learning goals and the learning goals we have for our students.


Check out this Google Doc to see more details on the schedule and to see how we crowd-sourced resources, inviting staff to add their own examples and resource to the Google Docs for each Spark Session.

Check out this Storify to get an idea of what the day "looked like." 

Future posts this week will share more details and resources from the Spark Sessions and Learning Labs.

If you are interested in learning more about our tradition of teacher-led institute days, check out the drop-down menu on this Teacher-led Institute Day link on our Collab Lab Resource Hub.


Classkick

By Mark Heintz

Game changer! I have heard this term used in education twice. The first time was from Persida Bujdei.  She came into a peer observation group and was ecstatic about the power of AirPlay.  She was right on the implications and power of AirPlay. AirPlay continues to be a game changer!

The second was from Rachel Barry.   She came in after using Classkick for the first time.  Game changer was all she said. After using it, I cannot say enough on how much of gamer changer Classkick is.    Click here for the website. The website automatically plays an overview video that provides functionality of Classkick.

 It is an amazing tool! The user can upload any pdf or image into Classkick.  Classkick also connects with Google Drive. Any images or pdf already in Drive can be selected.  Once uploaded, the user easily can select any part of a pdf.

From Rachel's remark, I quickly created a lesson using Classkick. The lesson focused on the analysis of evidence and student writing.  The power of Classkick lies in the instant feedback it grants to the students and teacher.  The teacher can select any student and view their work in real time.   The teacher can comment on the information and the student receives the feedback in real time.   IN REAL TIME!


Since it is in real time, the feedback is immediate.  In the above image, the student wrote, "In both places."  I circled which places, and then they inserted Europe and Africa. The whole process took less than thirty seconds.  Since it was so fast,  the student's learning progressed quicker than ever before, because they received almost instant feedback while in the writing process.


The above image is the teacher's view.  The teacher can easily see the progress of all students. The teacher can click any square for a zoomed in view and the ability to provide feedback.  A great part of this view is just watching students think and express themselves in real time.  You don't have to be right next to the student, which allows students a degree of normalcy when writing.  Furthermore, the teacher can display any work via AirPlay.  Therefore, if a student writes something that is worthy of showing to the whole class, the teacher can easily display the work. The great thing, the teacher can display multiple student examples very quickly because of the central location of the work.


The student's work above shows their writing in purple and the teacher's feedback in red. The black is another student's feedback.  That's right, the teacher can enable student to student feedback.  And the student to student interaction occurs in real time!  The student can click on the hand icon in the upper left hand of the screen.  Once raised, teachers and students can help the person with the raised hand. Students can only help another student if the hand is raised.  They can then comment. The primary user can always delete any comments written by the teacher or another student.  

Students can work ahead if needed.  Also, students can work on the task after the class ended. The last bonus I will raise, is the work is saved for later use.  


Tuesday, January 19, 2016

Saving A Schoology Course to Resources

Two important Schoology reminders for the end of the semester are saving your course to Resources and keeping your course from being archived. A step-by-step description of how to save your course to Resources is provided below (thanks to Kirsten Fletcher) and a click here to view a prior blog post on saving your course from the "archive".

To move course material to resources (recommended at end of semester)...
  • First, go to Resources and create a collection by clicking on the file box with the green + sign. Give your collection a title (i.e. French 1). Within this same collection, you can save each semester of your course as a separate folder.
Screen Shot 2016-01-11 at 9.43.08 AM.png


  • Go to Course page and click on Options -> Save course to Resources


Screen Shot 2016-01-11 at 9.45.04 AM.png


  • Choose the collection you created in Resources and click submit
Screen Shot 2016-01-11 at 9.46.03 AM.png


  • Discussion answers, grades, students’ grades and posts, and students’ assignment submissions will not be copied to resources

Friday, January 15, 2016

Final Exam Grades & Submission in Infinite Campus

This blog post is to be used as a reference for creating your final exam/assignment in Infinite Campus, how to finalize your grades, and how to generate reports to save for your records. We would like to thank the D214 ITF team (Linda Ashida, Dawn Bodden, Matt Hamilton, Rebecca Kinnee, Gabriella Stetz-Jackson, and Jeff Vlk) for compiling these resources!

1. Creating Your Final Exam Assignment and Entering Scores
  • Log in to Campus Instruction and click on Grade book on the left side:
  • Select a class from the drop down menu:
JHHS HD:Users:gabriella.stetz:Desktop:Screen Shot 2014-11-24 at 2.23.36 PM.png
  • Click +Add to add your final exam assignment:
Screen Shot 2016-01-04 at 10.33.05 AM.png
  • Enter the name and abbreviation as usual:
Screen Shot 2015-05-07 at 2.05.11 PM.png
  • For the grading task, select Exam and enter the total points possible:
Screen Shot 2015-05-07 at 2.08.56 PM.png
  • IMPORTANT: Once you create your assignment, you will not see it in the same window as all of your Sem 1 assignments. You must select Exam from the dropdown to see the assignment and enter scores:
Screen Shot 2015-05-07 at 2.12.13 PM.png
  • If you have multiple parts to your final exam, follow these directions for each part you need to enter (click +Add, add the assignment and select Exam for the grading task to enter the points possible).
  • After you have created  your assignment, fill in the grades for the assignment.  

Then:

Go to the Final task and check to see that the grades are the way that you want them.  In this screen, you will be able to see the posted Final Grade, the Sem 1 Exam grade, and the Sem 1 Sem 1 grade.  If you need to override or adjust any grades, you will need to do this in each individual task.  


You will receive directions soon on SUBMITTING end of year grades and running end of year reports!

2. Submitting Semester Grades
Remember that these steps need to be completed for each and every class.
  • Log in to Campus Instruction and click on gradebook on the left side:
  • Select a class from the drop down menu:
JHHS HD:Users:gabriella.stetz:Desktop:Screen Shot 2014-11-24 at 2.23.36 PM.png
  • Click on Settings to expand the window:
Screen Shot 2015-03-19 at 8.58.12 AM.png
  • Under the Preferences menu, select Use Canned Comments and click SAVE (THIS STEP WILL NEED TO BE DONE FOR EACH SECTION YOU TEACH):
Screen Shot 2015-03-19 at 8.57.20 AM.png
You may have already done this at the beginning of the semester. Please see sheet included in email with all of the canned comments you can use!

COMPLETING SEMESTER GRADES INVOLVES THREE STEPS:

  1. Post to Sem 1 Sem 1 (this is the grade BEFORE the final exam is factored in)
  2. Post to Sem 1 EXAM (this is the final exam grade)
  3. Post to Sem 1 FINAL (this is the final transcripted grade - made up of the Sem 1 grade and the EXAM grade)

STEP 1--Post your Sem 1 grades!
  • Be sure you have your Sem 1 Sem 1 gradebook selected where all of your grades have been populating:
Screen Shot 2016-01-04 at 10.43.32 AM.png

  • Click the POST button above the word Grade in the In Progress section:
Screen Shot 2015-03-19 at 9.03.17 AM.png
  • In the Post Grades window, select Sem 1 for Term and Sem 1 for Task.
Screen Shot 2016-01-04 at 11.09.00 AM.png
  • Once you are taken to the Sem 1 window you will see your posted grades. Here you can review the grades and make any necessary changes/overrides:
Screen Shot 2015-03-19 at 9.27.16 AM.png

  • In this same window, you will also see options to either FILL in your own comments, or use CC for Canned Comments:
Screen Shot 2015-03-19 at 9.10.35 AM.png

Note: For consistency sake, we are going to put all of our comments HERE, not in the final grade section. This way, the comments will populate all in the same place for the students.

  • Click on CC to select canned comments - check the boxes next to the comments you wish to select and then click Add Comments (YOU CAN SELECT UP TO TWO COMMENTS)

  • You will see the comments you select filled in next to the students names and grades. Click Save when you are finished!
Screen Shot 2015-03-19 at 9.17.19 AM.png

STEP 1--Post your Exam grades!
  • You now need to submit your final exam grade. Be sure you have your Sem 1 Exam gradebook selected. When you open this grade book, if you put in your final exam assignment correctly, you will see your final exam grades here.
Screen Shot 2016-01-04 at 10.45.54 AM.png

  • Click the POST button above the word Grade in the In Progress section:
Screen Shot 2015-03-19 at 9.03.17 AM.png

  • In the Post Grades window, select Sem 1 for Term and Exam for Task.
Screen Shot 2016-01-04 at 11.07.25 AM.png
  • Once you are taken to the Exam window you will see your posted grades. Here you can review the grades and make any necessary changes/overrides:
Screen Shot 2015-05-19 at 9.42.24 AM.png

  • Click Save when you are finished!
Screen Shot 2015-03-19 at 9.17.19 AM.png

STEP 3--Post your Final grades!
  • You now need to submit your final grade that is transcripted. Be sure you have your Sem 1 Final gradebook selected. When you open this grade book, the grades that populate there will be the calculation of your Sem 1 grade and your Final Exam grade based on your grade calc options set-up.
Screen Shot 2016-01-04 at 10.47.13 AM.png

  • Click the POST button above the word Grade in the In Progress section:
Screen Shot 2015-03-19 at 9.03.17 AM.png

  • In the Post Grades window, select Sem 1 for Term and Final for Task.
Screen Shot 2016-01-04 at 11.08.20 AM.png
  • Once you are taken to the Final window you will see your posted grades. Here you can review the grades and make any necessary changes/overrides:
Screen Shot 2015-05-19 at 9.42.54 AM.png
  • Click Save when you are finished!
Screen Shot 2015-03-19 at 9.17.19 AM.png
To submit your NEXT class, switch classes and be sure to GO BACK TO THE START OF THESE DIRECTIONS AND FOLLOW ALL STEPS.

TO CHECK YOUR WORK:
You can go back to each class and confirm that you have successfully posted grades. Just like when you post your eligibility, you can see that grades have posted because the posted section will be populated.
Click on the dropdown menu and select the Grading Task you want to check:
Screen Shot 2015-05-13 at 11.02.39 AM.png
ALSO, you can select Post Grades from the navigation on the left side and see what you have posted for each grading task:
Screen Shot 2015-05-13 at 11.05.08 AM.pngScreen Shot 2015-05-13 at 11.03.12 AM.png

3. Generating End of Year Reports
Please generate BOTH of these reports AFTER YOU HAVE FINALIZED GRADES for all of your classes and save them to PDF for your records!

STUDENT SUMMARY REPORT:  In order to see the breakdown for semester, final exam and final grades, you can generate a Student Summary Report:
  • Log in to Campus Instruction and click on Reports (Gradebook) on the left side:
Screen Shot 2015-05-08 at 1.36.46 PM.png
  • Select Student Summary from the drop down menu:
Screen Shot 2015-05-08 at 1.37.22 PM.png
  • Go through the checkboxes and make your selections. Then click Generate when you are ready:
Screen Shot 2015-05-08 at 1.45.11 PM.png
  • You will see a report that displays the grade summary for each student:
Screen Shot 2015-06-02 at 6.59.42 AM.png

SECTION SUMMARY REPORT: In order to see a report of all assignments, abbreviations and scores, you can generate a Section Summary Report:
  • Log in to Campus Instruction and click on Reports (Gradebook) on the left side:
Screen Shot 2015-05-08 at 1.36.46 PM.png
  • Select Section Summary from the drop down menu:
Screen Shot 2015-05-08 at 2.49.19 PM.png
  • Go through the checkboxes and make your selections. Then click Generate when you are ready:
Screen Shot 2015-05-08 at 1.45.11 PM.png
  • This report will be several pages long and will show you the following:
    • A log of your assignments and their abbreviations
Screen Shot 2015-06-02 at 7.03.36 AM.png
    • Scores on all assignments for all students
Screen Shot 2015-06-02 at 7.03.59 AM.png
    • Your Exam assignment(s) and scores for each student
Screen Shot 2015-06-02 at 7.04.27 AM.png
    • Your final composite score for the semester for each student
Screen Shot 2015-06-02 at 7.05.35 AM.png