
A few days ago Kim Miklusak came in to the Collablab and had an idea! She wanted to have students become better at self-assessing their ability level in writing. You can read about it here. She wanted students to have a greater awareness of what they are good at and what they need help with. Even more, she wanted a way to see the student self-assessment next to the teacher's assessment to see which students scores are not on par with their actual ability level. A teacher can easily create a rubric in Schoology and assess the students ability level. But it is time consuming to compile all of the student self-assessment data and record it next to the teacher's assessment score.
As of right now, a student cannot self-assess using a Schoology rubric. However, there is a workaround that I believe will allow students to self-assess and have teacher's easily see if students are close to assessing their ability levels in relation to the teacher's feedback.
The first step in this process is to create standards! I created two in a new category entitled "writing." I wanted to test this out, so I created a thesis standard and evidence standard.

To have students self-assess on these custom learning objectives, I created a multiple choice quiz. To have the mastery of these objectives show in Schoology, you must place the quiz in a graded category.

I made two questions in the quiz. One question was for the thesis and one question was for the evidence. I made four available answer choices to mimic the traditional four point rubric. To reinforce the criteria for each point on the rubric, you could embed the rubric in the question. Or, you could embed the criteria for each point on the rubric in the answer choices. Either way, this step will help or reinforce student understanding of the difference between the four points on the rubric, and lead to improved reliability in student self-assessment.
For the question, I made all of the choices the correct answer. Then the student will mark ALL of the levels they feel they are competent at. So, if a student feels they are at a level three competency, the student would mark choices one through three.


I then added the learning objectives to the question. For the thesis question, you only want to add the thesis learning objective. When finished, click create.

The quiz is for the students to self-assess and you to see what the student feels his or her competency level is. If you want to compare your assessment to the students, then you will need to create a rubric.
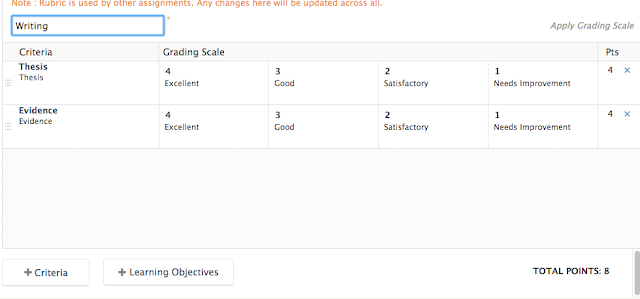
For this rubric, I added two criteria, thesis and evidence. I added my two custom learning objectives to the rubric. You can do this by clicking on the learning objectives at the bottom. When you add a learning objective, it will automatically place four criteria for the grading scale. You could be as specific as you wanted in each of the criteria.
When you click on the learning objectives Schoology will direct you to all available learning objectives. You can add all of your custom learning objectives at one time that you have already created.

Add the rubric to an assignment. When creating the assignment it is imperative that you place the writing in a category and attach the rubric. If it is not graded it will not go into the mastery report. Have students submit their writing.

When you click on mastery in Schoology, you will see your learning objectives. One should be thesis, or whatever you named yours. If you did it correctly, and students have taken the quiz and you have graded their assignments, there should a percentage for your students. Next to the students score, there should be a little superscript with the number two.


If you just hover over the two on the previous screen it will pop up the two scores.

Although this is a somewhat complicated way to compare scores, it can be a great way to record their self-assessment. It is an easy way to compile a lot of data and store it in one spot centered around learning objectives. Most importantly, it is a powerful way to engage students in self-reflection on their own learning. AND a way to dialogue with students in a meaningful and targeted to improving on very specific learning objectives. Conversations can be centered around disconnect and misunderstanding of what mastery even is.
Don't undervalue the tactic of suppression fire in an online shooter. If you are playing on teams, having one player just covering the area with live fire gives his teammates a great opportunity to sneak up on the enemy or at least to get a better strategic position. Working together like this can really boost your wins.
ReplyDeleteGTA V PC Game Full Version Free Download
Great stuff! Thank you! This works very well with the new "one point rubrics" that are gaining ground.
ReplyDelete