Thursday, September 3, 2015

Getting to Know You

By: Rachel Barry

My classroom and curricula are set up that my students collaborate everyday in my class.  In order to effectively collaborate with one another, they need to both feel comfortable within their groups and feel comfortable asking me for help when needed.  Therefore, they need to get to know each other and me!  In this blogpost, I am going to share with you a few ways that I have my students get to know one another.  Please comment with additional suggestions that you use in your classrooms!

1)  First Day of Class
On the first day of class, I had students in a seating chart, with name cards (notecard folded in half) telling each student where to sit.  As they are sitting down, I ask students to adjust their name on the card, if they have a nickname, and then write down any special needs on the inside of the card (ie: sit in the front of class).

Next, I had a few different ways for students introduce themselves to their groups and then to the rest of class.  First, I have this slide show up.  Once all students have made it to the classroom, I jump to the second slide:


This is a quick way for students to break barriers within their groups right away.  I walk around and listen to what the students are sharing with one another.  Then, I share a bit about myself, as I feel students are more comfortable when that have some insight into who I am as a person outside of school.  Following my introduction, I have all students go around the room and share a "favorite".  Each students' name card as their name written in one of three colors: green, purple, or red.  This slide tells each student which "favorite" to share with the class:

Sometimes I have to prod students to share, but most of the time students are eager to share.  

Finally, I have students download this Who Am I? worksheet from Schoology and complete it in Notability.  This assignment is two-fold: I get to know my students, and students get acquainted/reaqcuainted with using technology (using Notability, adding pictures to a note, submitting an assignment, etc.)


2)  Question of the Day
Everyday that we don't have an assessment in class, I ask students a "fun" question.  This year, I am using the Updates feature in Schoology.  

It's a quick attention-catcher right when the bell rings, and takes students less than 30 seconds to answer, and we all mutually learn more about one another in the process.


3)  Handshakes
In the past, I have made new seating charts every unit, however, I feel that some students become complacent in their spots.  This year, I am going to switch seats every two weeks.   On the first day of a new seating chart, I have students introduce themselves, shake hands, and provide some type of fun fact (birthday month, dream job, favorite fruit, etc.).  


Throughout the year, I use different methods to group students that also allow students to get to know one another.  Whether they are lining up by shoe size or grouped by their favorite fast food restaurant, I hope that they are becoming more comfortable with their peers, which I hope will lead to more collaboration.  Please comment with any additional methods you use in class to get to know your students and provide them with opportunities to get to know one another!

Wednesday, September 2, 2015

Teaching Vocabulary/Root Words

by Katie Winstead (Owen)

In District 214, we teach students following the Word Within a Word curriculum. The lists we go through expose students to the various Greek and Latin root words they might come across in academic and nonacademic settings.


Vocabulary Research

To teach vocabulary (and our root words), I have been using the LINCS strategy from Kansas University. LINCS stands for:

L - List the parts (word and definition).
I - Identify a reminding word (or a word with the root word in it).
N - Note a LINCing Story (write a sentence with the reminding word and the definition).
C - Create a LINCing Picture (draw a picture to remind you of the definition and story).
S - Study and Self-Test.

This strategy works because it makes kids into active learners that have to think and word with words instead of drills in memorizing. By writing the definition, a sentence and a picture, students are creating multiple links in their memory to help them recall what the word means. For more on the LINCS Strategy and the research behind it visit: http://www.matsuk12.us/cms/lib/AK01000953/Centricity/Domain/100/SEPGrant/LINCing-LINCS Sherrifinal.pdf

Katie's Resources:
LINCS Strategy Presentation
LINCS Strategy Cheat Sheet
LINCS Strategy Student Notes
LINCS Strategy Student Quiz 


Vocabulary Instructional Practices

When I first started teaching Word Within a Word, the students did this on physical notecards. Once some iPads started trickling in to my classroom, however, I decided that I needed to transform how we have traditionally taught vocabulary. I modified our sheets to include a sentence with a reminding word in it, multiple examples of reminding words, as well as pictures to help students make predictions about what the root word meant.


The instructional sequence goes as follows:

1.    Students would get a sentence like this:
When learning how to drive, the instructor told me to stay on the right side of the median.

2.    Students would then need to find and underline the root word within the sentence.

3.    I then showed them a couple examples of words with the root word in it (median, mediocre, mediate) and two pictures like these:
 
4.    The class would work together to predict what the root word meant, and then I would show them the definition.

5.    The students would write down a reminding word they liked and could use in a sentence (if they struggled, they had my sentence as an example) along with the definition of the root word. The sheet looked like this:

6.    We then made note cards following the LINCS Strategy.


Here is what the whole PowerPoint presentation would look like:


For awesome Google Slide templates, check out this website: http://www.slidescarnival.com/


Modify and Redefine Vocabulary Acquisition

I taught this way and had students make note cards until one weekend when I decided to go through 20+ flashcard apps on my iPad. I tried Evernote Peek, Chegg Flaschards, StudyBlue (which I did use for a while), Flashcards Deluxe, Flashcards+, Flash-Cards, Cramberry, A+ Flashcards Pro, and eventually found the one I am in love with: Flashcards [] by NKO Ventures, LLC.

Flashcards [] allows you to create a class (in the free version you can have up to 30 students and 5 decks at a time). The students can join your class for free and copy the decks you have created. I start all of my decks with the root word on the front and the definition on the back. Students then add a reminding word on the right, and on the left they add a sentence. The app even allows students to either draw a picture or add one from their Camera Roll.


So what?

That is just where the vocabulary practice begins. Once students are done, there are many games the students can play. In the free version, that can be things like matching, true/false, and a crossword. In the paid Teacher Pro version ($49.99), you get 100 Students and 75mb of server space - along with games like Flappy Dog and Ninja! Students can also do Q-Battle and practice their vocabulary words in a competition.

When students practice on their own deck, they get to see the sentence and drawings they created. After they feel like they know the words, I have them practice on the class deck where they just see the root word and definition. This also allows them to compete and be on the top of the class leader board.

Tuesday, September 1, 2015

Blendspace

by Kirsten Fletcher

Looking for a way to save all those links that fit in so perfectly with your unit? The D214 French team spent some time this summer curating authentic listening and reading resources in Blendspace.com. Blendspace is visually more appealing than simply posting links on your LMS. 


If you haven't checked it out, Blendspace is a free website where you can create pages of information that you can organize however you want. We, for example, have set up a different Blendspace page for every theme. See an example here. On each page, we have links to a variety of activities such as videos, interactive games, reading passages, etc. For each link, we have typed instructions to guide students in their comprehension. For some, we have also created comprehension quizzes. 

-> Instructions for the reading activity appear when students click on the link.


Our team plans to ask students to choose 3 links on each unit's Blendspace page and complete the required activity. We have created a graphic organizer where students can show proof of their work. It is also possible to have students log in to Blendspace and work within the site.


One of the advantages of Blendspace is the ability to share with other teachers. D214 French teachers have made one another collaborators on our pages, so that if one of us finds a good resource, we can upload it immediately. Like Kahoot, teachers can also search previously-made pages that other teachers have created.

If you have any questions about this or would like to brainstorm ideas, please stop by the Collab Lab.

Monday, August 31, 2015

Using Mini-Rubrics to Provide Feedback in Schoology

By Kim Miklusak

I'm excited to use rubrics in Schoology this year.  As I mentioned on my other blog [shameless plug], I'm looking forward to working with mini-lessons on skill-specific assignments that target what each student needs to be successful in larger reading and writing assignments.

The tricky thing on Schoology is where and how to set up the rubrics.  There are many websites and videos for setting up and using them.  If you're looking to start small, I recommend setting up a few generic ones.  For example, I have one set up for "journals."  I'm not grading all of my discussions in our actual gradebook, but I do want to provide students with targeted feedback on the depth of their responses to encourage them to give enough detail to explain their point of view.

Discussion topic & rubric
Grading view of a discussion on web browser
Grading view of a discussion on Schoology app

There are pluses and minuses to grading on the app vs. website.  The website allows you to clearly see which students' submissions have been graded, but it takes 4 clicks to finally submit the rubric.  The app is much quicker, a really nice interface, but it's hard to see which submissions have been graded--not a problem if you just move down the list and check every student, though.

Grading assignments with the Schoology rubric is so smooth on both the app and website.  This will be so helpful in giving immediate and detailed feedback to students on specific skills.

Grading view of an assignment on Schoology app

Please share ways you have used skill-specific rubrics in the comments below.  And please stop down to the CollabLab if you are interested in setting these up or would like to discuss more ways to use them in class!

Thursday, August 27, 2015

Reflecting on Freshmen First Days


Over the past couple of days I got to be a part of the freshman first days and worked with new students on digital citizenship, team building, and learning the in-and-outs of Notability. The new freshman brought a lot of fresh energy and I feel that the extra preparation over the last couple of days will pay dividends throughout the year.  A big shout out to the student leaders and especially all of the teachers that spent many hours planning the first days sessions! Just within the last two days, 56 Elk Grove teachers worked together and volunteered throughout parts of their day to run 14 unique sessions that served over 500 freshmen. This collaborative effort will help ensure that our incoming freshman feel comfortable and prepared for their year ahead.

Here are just a few of the tweets from the past two days of the freshmen first days. The EG Nation is off to a great start!

Tuesday, August 25, 2015

100% 1:1! Multiplying Learning for All: How We Make It Happen.

by Linda Ashida

At the start of this 2015-16 school year Elk Grove High School, and all District 214 schools, will transition to a 100% 1:1 learning environment.  Every student will have an iPad!

Access and Opportunity for All!
In a full 1:1 mobile learning environment we have a tremendous opportunity to transform learning for all students and staff. Today's Institute Day gave us the opportunity to share the ways we collaborate to do just that:


1) Strong Instructional and Technology support teams - with clearly defined and communicated roles:


2)  Teacher-led professional learning facilitated by our Collab Lab team.
We provide daily opportunities for personalized, differentiated and job-embedded professional learning. Our goal is to explore all of the ways that we can connect, learn and share our learning within and across disciplines.


3) Curate and share examples of our work to multiply our learning.
We do that via our Collab Lab Resource Hub, which includes our Collab Blog with daily posts by staff and students, our Twitter feed, and our shared professional learning calendar.


We also encourage staff to connect, learn and share via Twitter.  To facilitate the connection of Elk Grove staff with each other we use an Elk Grove Twitter List.  Staff can subscribe to the list and easily follow all of their colleagues and school clubs and sports.  For more on using Twitter lists for professional learning, check out this previous Collab Blog post.

Do you have ideas, suggestions, or resources to share?  We'd love to hear from you!  Leave us a comment below!


Monday, August 24, 2015

Schoology Calendar to Organize a Course

By Mark Heintz

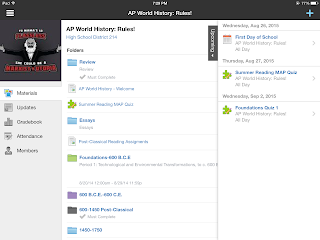
Schoology allows a variety of ways to organize a course.  I mainly use Schoology calendar events to guide students in my course.  I use the calendar over folders or updates because I structure my course with daily objectives and activities.  Calendars are how I plan, so it makes logical sense to me to use the calendar.

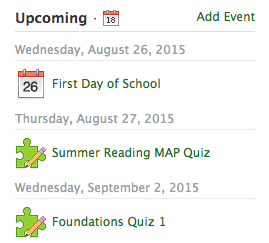
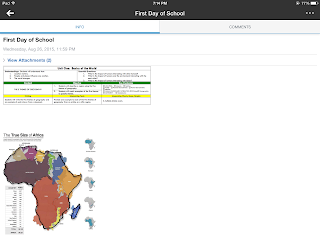
For students, posting all of the contents for the lesson in the daily calendar focuses students right away with an easy to follow routine. At the start of every class, students go the calendar to begin.  In the pictures below, the calendar is shown on the right display on the iPad or web.  If you have upcoming quizzes or assignments, the students are exposed to tasks that need attention.  Daily routines keep students focused and guide behaviors into learning focused activities at the beginning of class.


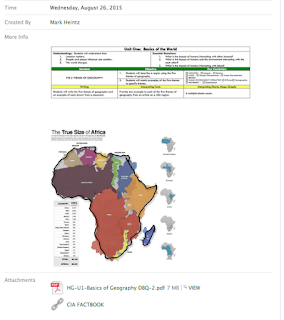
In the calendar, I can post the objective for the day, step by step instructions, images, videos, worksheets, readings, and web links.  I often post images for my bell ringers.  Students can see the images in color and zoom for further analysis. I post the question right there in the event.  This way I do not have to have a PowerPoint slide cued or write it on the board if I am coming into the class in a hurry. Calendar events allow students to post comments.  I often have the students post their answers to the bell in the comments.  

The calendar is great because it is ONE location for the entire lesson's materials. The students do not have to go to a discussion for a simple warm up or exit slip.  They can respond to other's comments, ask questions or do almost any feature a discussion can except grading.  For quick participation, the calendar is great. There are less transitions for students to get lost in the shuffle.  It maximizes classroom time and allows for total participation.   It is really easy for students to post new comments.  Students can see all comments made.

Also, the calendar houses all of the daily materials.  There is little redirection for students to access any of the daily materials. I teacher regular level freshmen, so I try to minimize transitions.  Another benefit is the students can go back to the event for any of the daily activities. If you are using pdfs, the event can have the links that students wouldn't be able to click.

At the end of the class, the calendar provides the opportunity for teachers to have an unplanned exit slip.  If there is extra time, you can have students post three things they learned, a question they have,  a summary of the lesson, or anything else you normally do as an exit slip.  The best part, if you created the event, there is a venue for students to post comments without creating anything new!

Another great feature of the calendar is it automatically archives the event.  Students can go back to any event in the entire semester.  If they miss a day they can go through the calendar and see everything they missed.


If you want to know more about how to do specific features in calendars, Schoology created a how to page. You can access it by clicking here.