Showing posts with label digital learning. Show all posts

Tuesday, May 8, 2018

Learning at Elk Grove: Intro to Engineering

By Patrick McGing, Merlyn Manoj, Kaelyn Rittle, and Mark Heintz


I was fortunate to visit Pat McGing's Intro to Engineering course a few weeks ago.  I asked him and a few of his students to document the learning that took place that lesson and what they hoped to learn in future ones.  From my outsider's perspective, there was a high level of student agency present.  The students were focused and working with purpose.  They rarely deviated from the task at hand and that was evident by the amount of time student spent on the task at hand.  

More importantly, the teacher and the students were all learners.  The teacher was learning right alongside the students.  Because the student projects were so different, it was impossible for the teacher to know the answers to all of their questions.  Rather than giving the students the answers or saying he did not know it, he worked with the students to come up with the solutions.  The equity in the partnership between students and the teachers reminds me that everyone is a learner and together we grow so much more than by ourselves.  Watch the short clip of student focus and the partnership between student and teacher.  Aftwerwards, be sure to read the reflections that follow.  


Teacher Perspective: Patrick McGing

What did learning look like in the lesson?

Learning looked like collaboration.

Students in this Introduction to Engineering Design section are at many different points in a project. Many students were working with their peers to solve problems, demonstrate, or just assist in a minor way to help a peer along. I could look around the classroom and see multiple students leaning over to their neighbor or getting out of their seat to assist a classmate. Therefore, the teaching did not come from me but from students peers.

  • Learning looked like students building skills in smaller areas of Autodesk Inventor with 3D modeling or 3D assemblies.
  • Learning looked like students building communication skills.
  • Learning looked like students building time management skills.
  • Learning looked like students recalling previous knowledge to aide in their current project.


What do you hope to do for the next time?

I hope for students to have a better grasp and understanding of assembling parts in Autodesk Inventor. Many of the students helping each other during the lesson were helping students assemble parts. Something I have tried in one of my other courses is having students develop a step by step “protocol” for troubleshooting specific problems. This helped students actually attempt troubleshooting a problem with already brainstormed solutions and gave them better success in solving a problem on their own. I would like to try this in my introductory course so that students could better persevere through problems.


Student: Merlyn Manoj

What did you learn this lesson?

During this project, I learned how to use my manage my time since we worked on our project independently. It was a bit hard though because if you were falling behind you would have to go to the lab outside of class to catch up with your peers. This project also gave me a lot of freedom since we had to create our own parts, and even though it was frustrating at times because you can’t just follow a plan right in front of you when things are going wrong, it was fun having that creative aspect in our project.

What do you hope to learn for the next time?

I want to learn more about Inventor rather than the basics of it. I think learning how to figure out a solution to a problem rather than just asking a friend or a teacher right away would be a great skill to have.


Student: Kaelyn Rittle 

What did you learn this lesson?

I’m not sure I can say I learned anything new from this unit because most of what we did included skills I learned in the past. However, this unit granted a lot of freedom as to what we were allowed to create, and I would say the design process was the most challenging for me. My project is slightly different in that I have two cranks whereas pretty much everyone else has only one which makes spacing everything just a little harder. I have 5 parts - three in the back and two in the front and measuring everything out so that they wouldn’t hit each other involved a lot of trial and error. This was difficult because whenever I’ve worked on Inventor in the past, I was either following a sheet with the dimensions given to me or I was physically measuring parts as I went along.

What do you hope to learn for the next time?

I think it would be fun to work with other features on Inventor that I haven’t used before. As far as I know, I’ve only used the very basics of it, and maybe exploring it more will help me further understand the program in case I were to ever use it in the future.

Thursday, April 7, 2016

A Student Perspective on AP US History Scoreboard

By Xochitl Soto, Junior at Elk Grove High School


 The AP US History teachers are using a new app in their classes to help students review for next month's AP exam.  Last week, the Collablab assisted the AP US History team in setting up the new app. The app is called MME Connect, and teachers are able to assign questions for formative review in preparation for their AP exam.  Since then, a student wrote a review of how it is impacting her prepare for the exam.  Here is that review:


I found the AP US History Scoreboard app to be very useful in the way that it offers many different types of review practice sets. The adaptive review is categorized into time periods and each time period has ‘learning missions’. I really like this because the learning missions are based on time and efficiency. For example when I'm short on time I would do the ten question set or the four question set, related to the time period, and each set has an adaptive setting that according to my confidence level it would repeat questions to assure that I've learned them. With a little more time I can sit down and to do the full assignment in one go. The Scoreboard app also includes multiple choice, short answer, document based and long essay exams; all of which I wouldn't have been able to thoroughly studied on my own. In my opinion, the app is a way better use of my time when studying for the AP test.


Monday, February 1, 2016

Easier Presentations for All Subjects with Adobe Voice

By Kim Miklusak

I was first introduced to Adobe Voice through pre-service teachers who raved about the app, citing that it was so easy that kindergartners could use it!  I hadn't had an opportunity to try it out in class until this week when our American Literature class began preparing for our oral communications unit on a real-life nonconformist after having read Sula by Toni Morrison.  This will be part 1 of a blog; next week I will share out student samples and provide more feedback.

I cannot stress how simple Adobe Voice is for any subject or grade!  It's the best of a few apps all in one.  Also, it's free, which is always helpful.  The app first allows you to name your presentation and select a template if you want one.  All this does is set up key words for certain slides.  You are welcome to change, add, or delete slides to meet your goal.


There are several simple and pre-made template for backgrounds and slide transitions as well as layout design.  The downside (or upside) of this is that you cannot design these slides as you want.   You can also select music--which I wouldn't suggest if you have students speaking over it.  If you are not speaking in the presentation, you can set how long you want each slide to play for.  Otherwise the slide stays on the screen for as long as you talk.

When you want to add a photo, you are given a few choices including from your camera roll, taking a picture, or searching.  All of the search options are copyright safe!  This is a huge digital citizenship teachable moment for students.  One thing I noticed, however, is that there is not always a huge amount of photos.  I found more available for reuse through Google; I simply saved them to my camera roll.


After the presentation is done, students can record their voice if they would like.  This is the easiest option ever.  You simply hold down the record button and speak.  If you would like to record over what you just said, you just press the button again!  This is a huge bonus over other similar apps in that you don't have to re-record your entire presentation if you mess up on one slide.  The down side in comparison to some other apps, however, is that you cannot write or draw on any of the slides, which may not be a problem depending on why you are using it.


When you're ready to share, it's as easy as ever.  Among the options are emailing a link or tweeting.  For example, here is a link to the sample I made to share with my team and students.  However, the option I'm most appreciative of is the ability to save it to the camera roll because then I can upload it and have students upload them to a Schoology Media Album to share!  Now every student in class can provide feedback on all of the presentations.

I will post again next week with student samples and more feedback. 

Monday, January 25, 2016

Classkick

By Mark Heintz

Game changer! I have heard this term used in education twice. The first time was from Persida Bujdei.  She came into a peer observation group and was ecstatic about the power of AirPlay.  She was right on the implications and power of AirPlay. AirPlay continues to be a game changer!

The second was from Rachel Barry.   She came in after using Classkick for the first time.  Game changer was all she said. After using it, I cannot say enough on how much of gamer changer Classkick is.    Click here for the website. The website automatically plays an overview video that provides functionality of Classkick.

 It is an amazing tool! The user can upload any pdf or image into Classkick.  Classkick also connects with Google Drive. Any images or pdf already in Drive can be selected.  Once uploaded, the user easily can select any part of a pdf.

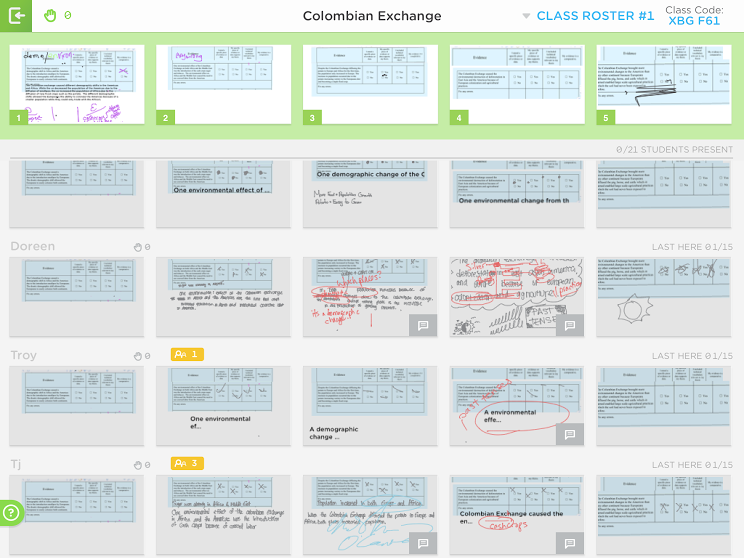
From Rachel's remark, I quickly created a lesson using Classkick. The lesson focused on the analysis of evidence and student writing.  The power of Classkick lies in the instant feedback it grants to the students and teacher.  The teacher can select any student and view their work in real time.   The teacher can comment on the information and the student receives the feedback in real time.   IN REAL TIME!


Since it is in real time, the feedback is immediate.  In the above image, the student wrote, "In both places."  I circled which places, and then they inserted Europe and Africa. The whole process took less than thirty seconds.  Since it was so fast,  the student's learning progressed quicker than ever before, because they received almost instant feedback while in the writing process.


The above image is the teacher's view.  The teacher can easily see the progress of all students. The teacher can click any square for a zoomed in view and the ability to provide feedback.  A great part of this view is just watching students think and express themselves in real time.  You don't have to be right next to the student, which allows students a degree of normalcy when writing.  Furthermore, the teacher can display any work via AirPlay.  Therefore, if a student writes something that is worthy of showing to the whole class, the teacher can easily display the work. The great thing, the teacher can display multiple student examples very quickly because of the central location of the work.


The student's work above shows their writing in purple and the teacher's feedback in red. The black is another student's feedback.  That's right, the teacher can enable student to student feedback.  And the student to student interaction occurs in real time!  The student can click on the hand icon in the upper left hand of the screen.  Once raised, teachers and students can help the person with the raised hand. Students can only help another student if the hand is raised.  They can then comment. The primary user can always delete any comments written by the teacher or another student.  

Students can work ahead if needed.  Also, students can work on the task after the class ended. The last bonus I will raise, is the work is saved for later use.  


Tuesday, December 1, 2015

A(P) World without a textbook

By Mark Heintz

Let me preface this blog post by stating that I had one of my most successful years in my AP World History course as measured by pass rate and the number of students who took the exam.  Despite that success rate, some things nagged at me.  I assigned a lot of work. Most of it was very targeted, I could tell if the students completed it, and it prompted them with feedback to help them move forward in the learning process. However, it was a lot of work, and I don't feel that a student should spend that much time outside of class.  So, every time I asked my students how much time they spent on the course, their responses wounded me.


Here is what I wrote about the textbook last spring: The book our district adopted is a challenge.  To be fair, I was on the textbook adoption committee and approved the book. But, I digress.  First, the book is at a college reading level.  Second, the book assumes the students have a great deal of background knowledge.  The book is great for students who know a lot of history, but almost all of my students are taking their first world history course. The students spend a lot of time outside of class trying to decode the text book.  No matter what pre-reading strategies are done in the classroom, it is still very difficult for my students to comprehend the material.


Last year, my attempt to help students centered around creating materials to help them with understanding the textbook, but I didn't feel good about that. Why was I doing all of this creation and instruction around reading a textbook? I would rather have spent time on primary sources or targeted feedback.  This year, I took a hard look at the AP World course guide. 

Furthering the issue, this year my students have a lower average on their Plan reading score and Plan composite scores by over one point compared to last year. So, the book is a major challenge and often pushes kids to believe they cannot achieve. First quarter has been a struggle. To say the least, the first two unit exams did not go well at all. 

In response to those poor test scores, I broke down each objective for the students.  It was very tedious, but incredibly rewarding. I found I taught too many things and neglected others.  But, more importantly, I now know what exactly I want the students to know. In a class that is meant to cover the entire history of the world in one year, it is easier when you know what you want your students to know. 

It is not easy to decipher what the College Board is looking for. Here is what the College Board provides.
I broke it down by the following:

I then have the students complete objective checks in class from time to time to see if they need more instruction on the topic. Here is what that quiz looks like:

I got the idea from the science department. They have been doing some fantastic work with breaking down what they want their students to know.  I give the students the objectives and as we go through the lessons, we fill out the answers. Then they just simply have to repeat. The problem with the course is that there is a lot of information to digest. So, it is a cumulative effect. The best part is, the students have a self-reflection built right into the objective check. Do you know it or do you not know it? The kids then know which objective they need to go back and study for the next check. 

I posted earlier about Schoology checklists and how to leverage them. I created 10-20 questions for each objective. So, the one above really has two objectives, and I created 14 questions for the Byzantine and 12 questions for the Sui, Tang and Song.  These quizzes serve as their homework. The quizzes provide instant feedback and a short reading that can redirect them to the correct answer.  

I have ditched the textbook as the core homework. I do use it as a resource from time to time in class, and it is always available to students if they want to read it.  My students are now reading more primary sources. I still employ pre-reading strategies to have the students access the primary sources. My students are writing more than they ever have before.  They are writing their understandings of the content. They are analyzing prompts more frequently.  They are doing the work.  

The big question is, does it work? I have given three summative unit exams with 50 questions each this year: River Valleys, Classical, and Post-Classical.  The average on the River Valley test was 31/50.  The average on the Classical test was 32.89.  After which I made all of the changes described above.  The success...the class average on the Post-Classical test was 40.6.  My students are doing less and getting more out of it. 


Monday, November 9, 2015

Pre-Reading

By Mark Heintz

In human geography the students are learning about population density and distribution. After going through several days of effects of populations density, the students did an in-depth look at Bangladesh and the effects of population density.  The lesson included an article on the effects of population density on Bangladesh.  Almost all of my students have never heard of Bangladesh. The make the article more approachable, I inundated them with images, maps, videos, and discussions that built their background knowledge.

I first gave them the location of Bangladesh and its relative size to the USA.

Then, I gave them a map of Bangladesh. The class discussed the impact of the water on the population.  

After looking at the maps, the students watched a three minute video clip on the population growth and water problems associated with the rapid population increase. Finally, the students looked at several images of Dhaka. Again, the class discussed the visuals.  


The process took thirty minutes.  The students read and annotated the article.   It was great! The students were engaged the entire time they read. The post reading discussion was high level and their comprehension was fantastic! It just shows the power of building their understanding before they read. 


Friday, June 5, 2015

On Making Mistakes & Learning in a 1:1 Classroom

By Kim Miklusak

This has been a year of uncharted territory for many of us.  Although I had worked with iPads and technology prior to this year, it was my first year teaching in a full 1:1 classroom.  I have to say I was nervous--especially working with people who had been in iPad pilot programs for a few years.  I was nervous that people would ask me questions that I may not immediately know the answer to.  I was nervous that I would try things out in my classroom and they wouldn't work.  I was nervous that I would take time to make something only to find a better way to do it later.

And you know what?  All of those things happened.  But because of the general support structure at  EGHS--and throughout the district as a whole--as well as the specific support structure of the CollabLab and my peers, I was able to learn and grow alongside those I was helping--and alongside my students!  I appreciate the willingness to share in our school, and I appreciate the instructional conversations we can have in our departments and across departments.  I've learned as much from teachers in other subjects as I have from teachers in my own!  Additionally I've learned so much from connecting with people on Twitter and at EdCamps.

I know the shift in instructional technology is a big one, and we are all in different places with it.  The mindset at our school is so important: move at a pace that is comfortable for you.  For some that means considering the SAMR model and working first with substitution as we digitize curricula.  For some that means trying out one thing such as doing entrance or exit slips on the iPad each day.  For others that could be doing one project on the iPad.  And still for others that means transforming as many pieces of the curriculum as possible.

The key is always, however, to realize that whatever we do for the first time, we may (we will!) find more effective and efficient ways to do it in the future--especially if we share our successes and missteps with others.  As long as our instructional focus comes first and technology comes second, the technology will be there to enhance as oppose to diminish what we do in our classrooms for our students.

Thursday, May 28, 2015

Curriculum Changes-Mastery of Learning

By Mark Heintz


The Elk Grove freshmen human geography team added a document based question curriculum to achieve higher level thinking skills.  Over the last month of school, the team has been testing new ideas through student-centered document based instruction in hopes to get a great understanding of how to move forward next year.  The concepts and skills are driving a focus for next year in human geography centered around four main categories.


Content
Writing
Interpreting Texts
Interpreting Charts, Maps, Graphs
·        See each unit plan.
·        Write main ideas to examine and convey complex ideas.
·        Through writing, provide examples to support main ideas.
·        Through writing, analyze details. 
·   State the main idea from texts.
·   Draw evidence from texts to support main ideas.
·   State the main idea of charts, maps, and graphs.
·   Provide evidence from charts, maps or graphs to support the main idea.
One summative multiple choice test per unit.


One summative writing per unit.  Each unit the skills will build upon each other.  The grade will reflect the students overall writing ability at the end of the semester.


One summative interpreting portion per unit as measured by providing the main idea and supporting details for the number of documents listed.  The overall category grade will be reflective of the student’s ability at the end of the semester.
One summative interpreting portion per unit as measured by a multiple-choice test.  The test will cover charts, maps and graphs.  The overall category grade will be reflective of the student’s ability at the end of the semester.
30% of the overall grade
20% of the overall grade


The team came to agreements that the semester grade would reflect student's current ability levels.  From the "testing" period, came a greater understanding of what students were capable of and what we as teachers could do to improve the student's mastery.  Over the semester, the skills would advance, requiring higher level thought processes.  Additionally as the year progresses, increasingly complex passages will be used as their abilities hopefully improve.

The work that we are doing is has been so rejuvenating for me as a teacher as we move towards a place where students are rewarded for mastering content and skills over time.  The students' learning is centered around interpreting texts, charts, maps, and graphs to learn content.  And then writing to express their understanding of content.  It is very powerful and the impact in the classroom leaves students tired from thinking so much.  

Another change is the instruction.  Since the team's focus is centered around a blend of skills and content, the instruction must mirror that.  That subject is for another post.


Wednesday, May 6, 2015

Active Learners

By Mark Heintz

I create a lot of materials for my students to learn such as lecture notes, examples, PowerPoints, quizzes, review materials, videos and a number of other items.  I learn a lot in process of creating these materials, in fact, way more than my students, because I create and they do not.

In my first few years of teaching, I was the sage on the stage.  I lectured and created materials all towards the purpose of students understanding the content.  However, I found that I spent an exuberant amount of time going back over material that I already covered, because the students had poor retention rates of the material.  Even more revealing, the review day had more of an impact on students test grades than the learning that occurred over the entire unit.  The review day put material in their short term memory that was useful on the test the next day.

After reflecting, I found that most of the student learning was passive.  So, I present the Cone of Learning! When students are active in the process, their retention rates increase.


Now, I want my students to be an active participant in the learning process.   The picture below shows one of the learning goals for the first unit our Human Geography class.   Also, it states the skills students will develop in that unit.  The marriage of these two, content and skills, is crucial to learning. It forces the learning process to be based on reading, writing, interpreting, and mainly doing the work. 


After the purpose has been set, the students will manipulate images to one of the categories of the five themes.  Then, the students will write why they think the image belongs in that category.  I should preface this learning progression by stating this will be the students first exposure to the five themes of geography.  I want the students to build their background knowledge through interpreting images and writing out their understanding of that interpretation.  Then, the students will discuss their interpretations in a small group setting, and finally report out as a class.

Normally, I would have lectured to the students on the five themes to first give the students background knowledge.  I would have found images to give the students specific examples and guided them through the themes from my direct instruction.   Now, I love the students being an active participant in their learning.    


All of this background building will lead to the students writing in response to a document based question on the five themes of geography. Along the way, students will have practiced the skills and been given feedback as they learn.  They will write to learn and learn to write at the same time, all while being active participants in the learning process.  

Wednesday, April 22, 2015

Student Feedback and Notability

By Mark Heintz

A few weeks ago, Linda Ashida posted on Katie Owen's innovative idea of sharing Notability notes to students.  You can read her post here.  Lately, I have been using this practice to increase student engagement and feedback.   Also, as the school rapidly comes to a end, time is precious.  Using shared notes increases classroom time because students are not spending time copying information from one place to another.  Therefore, more time is spend in the analysis of student work and providing feedback.

I recently used this strategy through a list of topics/terms on the USSR and CCP.  I shared the note with the students, and I asked them to move the information to either category.  They could copy the terms to place under both groupings.  When they finished, students shared their work via AppleTV. This practice enabled the class to go through the answers and provide feedback on their selections.  The entire task took only a few minutes to create and a few minutes for the students to attempt.  The discussion that followed the assignment was rich. Since the activity only took a few minutes, there was time that allowed for students to ask questions on why a term was in a specific category.  At the end, some students had a list of terms they needed to look up for further review.  Next time I do this activity, I will ask the students to use the words to draw comparisons.


Another example of this practice comes from a first year teacher, Kristen Gierman.  To help students writing, Kristen created a note that contained elements of a paragraph.  She wrote one main idea statement that the students located and move to the top of the page.  Then, the students went through all of the other statements to determine which were the best support of the main idea.  The students simply erased the ones that were off topic and moved the ones in support to the order they belonged in the paragraph.


The students shared theirs versions of the paragraph and defended the placement of the statements to the class. It was great to see the students evaluating work and seeing their rationale. Many of the students understood the necessity for clarity in their writing and often cited that as a reason to exclude some pieces of evidence. At the conclusion of the activity, the students wrote their own paragraph.  The writings were some of the strongest I have seen students create in my nine years as a teacher.  It was great to see the students use the structure, clarity, and use of strong evidence from the example in their own writing.   


Wednesday, April 1, 2015

Spring Break


By Mark Heintz

Spring break has come and gone.  Here in Chicago it snowed two days and barely got above 30 degrees. At least I got to use my snow blower.  But, that is not the point of this post.  The point is to show the power of spring break.
Spring break can be a time for rejuvenation before the final push of the school year.  It can be a time for students to take a break from the stress of exams and homework.  It is nice to have the students recover and see the last quarter with fresher minds.  They come back a little more willing to learn. However, spring break can be a time for students to get ahead or caught up.

There are forty-two videos John Green created for world history.  They are amazing, and I use them as review for the AP exam.  In Schoology, I have all forty videos posted with a short little quiz that a former student Deanna Duffy helped create last year.  I set a calendar for the students that starts over break to have them watch all the videos by the exam, watching about one a day over the next forty days.  In total, it is over 400 minutes over video.  Several of my students used their spring break to complete ALL the videos.  Every one of them.  I am continually impressed by the amount of time some students put into their work.  Now to be fair, there were some who did not start their videos at all. But many did more than they needed and used their break as a time to get ahead.  When the students finish all their videos, they get a badge in Schoology called the Fault in Our John Green.


Tuesday, March 31, 2015

In-Service Day Preview: Spark Sessions & EdCamp

This Monday the CollabLab will help facilitate a portion of our school's In-Service Day focusing on instructional technology.

First, we will be offering a 45-minute session of "Spark" Presentations. A Spark Presentation is a 3-5 minute presentation of an educational technology strategy that teachers employ with their students. These are not formal presentations;  think of a "spark presentation" as a kind of "show and tell." For example, Gary Alperin will share how he uses the student-response app Kahoot and Dean Burrier Sanchis will share how he uses his Weebly Website. We are planning to have Spark Presentations by 8-10 staff members. We already have several teachers who have volunteered, but we want to open this opportunity up to everyone. 


After this we will move into a mini-EdCamp.  EdCamps are "un-camps," free professional development for teachers and by teachers.  There are EdCamps hosted in many areas around the world.  Our local one is EdCamp Chicago, and the next meeting will May 9, at Bednarcik Junior High School.  Elk Grove will host its first "mini-camp."

At the start of the event, teachers come up and suggest a session they are interested in.  This does not mean that you are running it or presenting it; it just means that you are heading there to start talking about it.  The idea is you vote with your feet.  If you go to one session, and it is not what you need, or if there is more than one session you want to see, you simply get up in the middle of the session, and go to another one! Another aspect of EdCamps is the sharing of information. There will be an open Google document available for each session to share out ideas with those in and out of the workshop time.

Check out this site next week for reflections from the day!

Wednesday, March 18, 2015

My First Video!

By Mark Heintz

Last week, Christina Barnum taught a few teachers how to create videos for her Biology classes using the app Educreations.  It was another great example of how easy it is to make videos and the different ways to implement them in the classroom.  I have wanted for a few years now to create videos to help students learn the material. I keep seeing examples from my own students that reading at home or on their own is not the easiest way to learn history.

The book our district adopted is a challenge.  To be fair, I was on the textbook adoption committee and approved the book. But, I digress.  First, the books is at a college reading level.  Second, the book assumes the students have a great deal of back ground knowledge.  The book is great for students who know a lot of history, but almost all of my students are taking their first world history course. The students spend a lot of time outside of class trying to decode the text book.  No matter what pre-reading strategies are done in the classroom, it is still very hard for my students to comprehend the material.


To help the students at home understand the reading, I made my first video! It was on methods used by Europeans to imperialize between the years 1750-1900.  I used the software Screenflow.  It records your screen and can record you at the same time.  Using this software, I record myself while filming what is on screen.  I remember reading Paul Anderson's guide to video making who gave the advice of putting yourself in the video to make it more approachable.  I took his advice.


Overall, I learned a lot from my first video.  I spoke too fast and stumbled over words.  But, I love the idea.  The video is short and gets to the point. I made a few multiple choice questions to go with the video to have students self-assess their comprehension of their learning.   Now, I have the video forever. If a student is absent or is having difficulty understanding the material, they will be able to go back and re-watch it.  I have since made five videos in the past two days and am jonesing to make more. 

One last note.  Making the videos really was a self reflective process on what students need to know. I summarized the facts and story of history.  I feel like a true historian by pulling sources together to tell a story.  It is interesting to see what I leave out, include, and how I put the story together.  


Tuesday, March 3, 2015

Individualized ACT Math Prep

By Rachel Barry

In light of Illinois state testing this week, I decided to use this blog post to reflect on our ACT test prep course.  Four years ago, my coworker Ami Heng and I took over the math portion of the ACT prep course at our school.  We wanted to develop a course that was more individualized and technology-based for our students.  Our modes of providing resources to students have changed over time, as we originally had students using a Google Site on desktop computers and now students have a Schoology course on their own iPad, however, the process is very similar.  

Before I dive into our course, I would like to provide you with a little background information.  The ACT math test is based on eight pillars of topics in mathematics:


Ami and I read through numerous retired ACT tests to see which of these topics showed up the most often and analyzed data from prior junior classes to see which standards students struggled with the most.  Of the 126 standards, we chose to focus on a core of 62 standards.  As needed we have added some additional standards over the past couple years.

Our course is split into four days of math.  We paired the skills based on topic and number of standards under each category:

The BOA standards were covered in daily exit slips because students constantly struggle with word problems and the ACT is inconsistent with the types of questions asked in this category.

Each day, students would take a pre-assessment on a specific CRS band of skills, one question per standard.  Following the warm-up quiz, students would identify all of the topics that they got wrong.  This is where the individualization came into play; students would begin working on their own skills of weakness instead of going over topics that only some of the class needed help with.  

For each incorrect standard, there was a folder on Schoology.  In each folder, students would have four to five items, depending upon if there was a graphing calculator component to the standard.  Here is the folder for GRE 504: Midpoint of a Line Segment:


First, the students would watch a video, recorded using the Educreations app, talking them through the problem that they got wrong on the pre-assessment.  Then, they would watch a short lecture video on the topic (a notes sheet is provided).  The calculator video is optional, as it walks students through the steps to solve these types of problems using the graphing calculator.  Next, students download a set of 3-5 practice problems into their Notability app.  Upon completion, they type their answers into the Practice Quiz to see how they performed.  


This process would be repeated for all questions that they had answered incorrectly.  As mentioned before, the benefit to this model was that students were each addressing their individual weaknesses.  I observed increased engagement in students because the material was meaningful to them and their time was preserved.  With approximately every three new skills that a student masters, their ACT math score will go up a point.  With their weaknesses addressed in this course, students are provided with a targeted approach to success.

Another benefit is that the use of technology allows for students to continue to work on these topics outside of our meeting time.  I see Schoology notifications at all hours that tell me that students are working on this course.  Students can e-mail me outside of class if they are struggling with some of the practice problems.  Overall, I feel that students have been able to improve their scores with this individualized method of ACT prep.

Thursday, February 26, 2015

Extending Learning Outside the Classroom

By Rachel Barry

When I was initially granted my 1:1 iPad pilot, I had hopes for my students to utilize the iPad beyond our 50-minute classroom.  Prior to my pilot, I would occasionally receive an e-mail from a student outside of class.  I would have to try to strategically type out answers (in words) to a math question, using terms and language they would hopefully understand.  Through the increase of technology, I have been able to provide my students with much more personalized, and hopefully more easily understood, responses.  

Through the use of the Educreations app, I am able to provide my students with "personalized tutoring".  By this, I mean that if they send me a problem or a screen-shot of their work, I am able to record a video talking them through the rest of the problem.  Students utilize this resource option when working on a review packet prior to a unit test, if they are absent from school, or simply when working on course material outside of class.  I then post any videos that I create to our Schoology course for all students to be able to access.

This mode of communication came in great use last Thursday, when we were out of school due to inclement weather, along with many Chicago area schools.  Kim Miklusak reflected on our students' remote learning in a blog post that you can view here.  Many students at our school utilized this day to continue their learning through accessing course work in Schoology, webinars with teachers, or communicating with teachers and peers through Twitter.  Personally, I was amazed and proud of how many of my students were working on their math problems from home and e-mailing me with questions!  My students were able to continue working through the course material and were not halted because they were confused by a problem.  Instead, they would send me an e-mail asking for help on a video, I would record an explanation, and they would be able to continue working.  Here is a sample video from the Cold Day, where I show a student how to set up a problem.

Please feel free to stop down in the Collab Lab if you would like any help recording videos!


Wednesday, February 25, 2015

Schoology Checklists to Teach Writing

By Mark Heintz

A few weeks ago @MsRachelBarry posted how to create a Schoology checklist.  If you want to learn how to create a checklist or don't know what they are, you should read her post by clicking here.  The checklist feature is great for materials that students can easily self-assess or can be automatically graded with an assessment, such as a multiple choice, matching, ordering of events, or true false questions.  You can mandate students post assignments, view links, or take assessments in the order you want them to.  I have used checklists in varying ways, but recently I created a Schoology checklist to help teach writing.

I teach a comparative essay in world history.  It is a very specific essay that addresses students ability to compare two concepts or processes using historical content.  Students struggle with writing and struggle more with writing in an academic sense.  Furthermore, teaching writing often comes with varying skill levels and the checklist allows for more individualized learning to take place.   Here is the prompt I used for this checklist:


For the first step, I had the students sort historical terms into either the Haitian, French, or Latin American Revolution.


When finished, the students submit their worksheet to Schoology. After submitting the worksheet, a quiz comprised of a matching question assessed the same information on the worksheet.  This is learning that the students could assess on their own through the quiz.  Here is a sample of the quiz:  

After students pass the quiz, they move on to grouping the information into either a method or an outcome of the revolutionary process.  The first two steps can sometimes be accomplished without my help.  Some of the higher skilled students can move onto to the harder concepts and work on the skills they need to at their own pace.  At the same time, I can have students who do not understand the content, stay at the own level and get the help they need. Furthermore, students cannot move on to higher level skills without laying the ground work needed to be a good writer.  It is a failsafe way to ensure students can be successful.  When students know the content and do the first steps, it helps students become successful.  Here is a sample of the grouping worksheet and quiz.  


After they pass the quiz, students have to check in with me, the teacher, before they can move on to the next step.  The next step is when students come up with possible groupings for methods and outcomes.  There is not one correct answer, therefore it cannot easily be assessed with a multiple choice assessment.  So, I have the students write their possible groupings in a short essay question in Schoology.  I check the students' work and approve of it before they can move.

Students move on to evaluating and writing of the essay.  I have the students read through several thesis statements to see if they contain all of the components needed to be considered a good thesis.  I then have the students submit their work and take a matching quiz in Schoology to assess their evaluative skills.  
Worksheet
Schoology Thesis Quiz
The last stage in the process is writing comparative statements.   Students will evaluate pre-generated comparative statements.  After reading the statement, they will fix the statement by rewriting it in the correct manner.  They will post their statements in Schoology for me to evaluate.  At the end of the lesson, the students will have a portfolio of student work and samples to look back upon for future essays.  

When completed, the students will be able to write the essay on their own.  This is in the early stages of the essay writing process.  The students will have seen several parts of the essay and have done the planning stages of the essay.  If everything goes well, the students will be successful when they write the essay.