Showing posts with label oral communications. Show all posts

Friday, October 13, 2017

Using Google Slides Q&A Interactive Feature

By Kim Miklusak

I had a presentation in my grad school class last night, and while preparing for it, I actually Googled "How to make Google Slides more interesting"...and that's how I got here.  Did you know that you can turn on an interactive Q&A option when you're presenting in Google Slides?

Here's are quick steps:
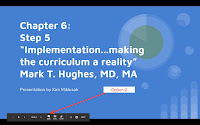
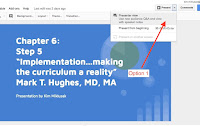
Step 1: The option to turn it on is found in 2 places: either under "present" or when you're already presenting, in the toolbar screen on the bottom.
Step 1, Option 1
Step 1, Option 2


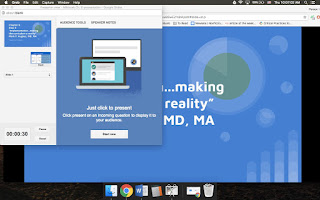
Step 2
Step 2: a small box will pop up on your screen.  From there you will see "audience tool" and "speaker notes" in addition to the running timer, a pause option, and a of your slides.  From this screen you will press "start new" OR, and this is really cool, if you've presented before, it will show you the option to click on the notes from other recent times you've given this presentation.  This is a nice feature because it will allow you to address any questions ahead of time if you feel you need to.


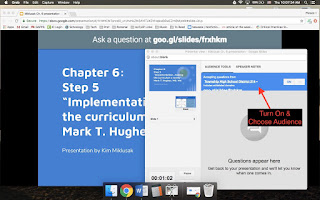
Step 3
Step 3: You will now have the option to select the audience.  Mine defaulted to our district; however, you can turn on so that anyone with the URL can respond.  This is a nice feature because you can choose to toggle this off or own depending on your presentation and what you need.  Once you press this button, the screen will remain like this unless you have audience members writing questions or making comments.  If this happens, a notification will pop up on "audience tools."  Otherwise, you can remain on "speaker notes," if you have them, to continue your presentation.


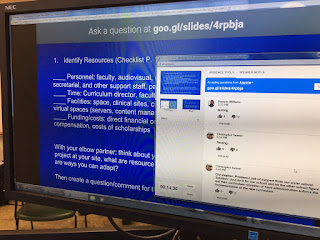
Step 4
Step 4: One of the nice features about this is that the audience is able to see each other's comments (anonymously or by name).  Therefore, people have the ability to "like" a comment, allowing the presenter to see a popular question.  Additionally, the presenter can click on the "present" button under a comment.  This results in the comment overriding the presentation slide and showing up as its own slide.  This way the presenter can show the comment/question to the whole audience and address it.

HOW this went in my class: My screen in class wasn't letting me show only the "presenter view," so my whole class was able to see my notes.  This wasn't a problem in the setting I was in, but it would have been a problem if I were given a formal presentation.  I would expand the usage with this from just Q&A and also allow for comments.  I can see many uses for this--especially in classes that are lecture-heavy.

Leave us a comment below if you have other suggestions, uses, or experiences in your class!


Friday, September 8, 2017

Perspective-Taking through class "Pinwheel" activity


In previous work in Emily Mikuzis’ senior English 101 class, her students worked on exemplification—making a claim and supporting it with examples rather than reasoned evidence.  In this case, students are using the guiding question “To what extent has your education served you?” with examples from their own experience.

To prepare for this lesson students read and annotated an excerpt from Ta-Nehisi Coates’ “Between the World and Me,” which focuses on his experience in education—specifically compliance versus critical thinking.  Students prepared by annotating form 4 different perspectives, color-coding each: urban student, suburban student, urban teacher, suburban teacher. 

They used Coates’ description of his neighborhood for the experience with urban schools and their own experiences with suburban schools.  Understanding that this pulls on some biases, the class had a conversation on empathy, per  While this is a limitation of the activity, the class talked through the nuances of each, handling it compassionately.  For example, one student pointed out that just because someone has a certain identity, it doesn’t mean they only have one perspective or a common perspective. 

Students worked independently first, then in small like-groups, then together in a “pinwheel” activity [from Sarah Wessling on the Teachers’Channel].   One member of each “perspective” sat in the “hot seat” and answered questions posed by the “provocateur,” who had prepared based on a question writing workshop held by the whole class on the previous day.  Therefore, groups were aware of some of the questions, but they could not prepare for all.  In the “pinwheel,” the provocateur also asked follow-up questions to continue and push the conversation.  Students referenced the text directly but also made inferences based on their perspective.  This is a much smaller group discussion than a Socratic with only 6 students in the group to encourage all students to participate while the outer group participated in a real-time backchannel on BackChannelChat.com

After class students debriefed.  Students expressed the difficulty in looking through others’ perspective, but they also appreciated that it slowed them down, forcing themselves to rethink what they would say.  They also really liked the backchannel because they could speak from their own life perspective and experiences, which allowed them a comfortable place to share.  In the end they felt it helped them take different perspectives in addition to simply analyzing what the text means.  After this practice activity, students will return to this activity in a few weeks, focusing on multiple authors and putting them “in conversation with each other.”

Wednesday, October 26, 2016

Sharing Student Voices: "Where I'm From" poems using Adobe Spark


For first quarter, freshmen created "Where I'm From" poems while reading House on Mango Street by Sandra Cisneros. They then recorded their readings of their poems using the Adobe Spark app. While the requirements were minimal, students applied their creativity using Adobe Spark by adding images, background colors, and music to reflect their poems. We required students to use this app because we wanted them to practice speaking loudly and clearly, but we wanted them to have opportunities for practice. Since we assess students' speaking skills in a number of formal and informal speeches, it was important for students to be able to practice speaking skills such as volume and annunciation in isolation. Overall, the students exceeded our expectations as listed in a rubric and created interesting and original projects that displayed their unique personalities and backgrounds.


And this one!


Tuesday, March 8, 2016

Reflection on Periscope

By Kim Miklusak

Last week I helped Rita Sayre Periscope her Science of Cancer forum.  While I had played around with the app a little bit before the forum, I definitely learned a lot from doing the event itself. 

It's very simple to set up.  Once you connect it to your Twitter account, it can send an alert to your twitter feed to let your followers know that you are broadcasting an event.  From the main screen you can also choose to watch events on different topics or presentations in your area. 

When you're ready to broadcast, you type in the title of your event.  There are a number of settings to allow people to connect with you and comment as you broadcast.  It also allows you to limit who sees your event.  I didn't use either of these functions, however.  When you're done, the link is live for 24 hours.  You can also save the entire presentation to your camera roll.

From a broadcast perspective, I can definitely see some limitations.  In the theater where Rita presented, it was hard to control the lighting, and the camera doesn't let you light balance like you would on the camera app.  It does zoom in and out, but again--maybe due to the lighting--the camera had a hard time focusing when she changed slides.  This also caused a problem when panning to follow her as she moved across the front of the room.

Overall, however, I think the possibilities for using Periscope in an educational setting are endless.  Immediately I could see using it for forum presentations, professional development days, assemblies, theater and music productions, sporting events, etc.  I know some teachers use it to broadcast their classroom as well, so that would be an interesting experience.

Please share with us in the comments any ideas you have for using Periscope in your classrooms and school as well!

Thursday, March 3, 2016

Pounce on Periscope: a Science of Cancer forum

By Rita Sayre

You poured yourself into creating an experiential lesson or forum, yet you had some students who missed it.  How can you re-create the experience for absent students?

Kim Miklusak, one of our DTCs, and I recently tried Periscope, an application that works with Twitter to create a live video feed of your lesson or presentation.  Anyone with the twitter link can join in and see your live video.  Even better, Periscope allows others to comment in real time on what is happening.  Students who are absent can participate in class in real time.

In D214, we love to create forums – common experiences for our students on a theme.  Presented in the theater, these experiences become an enrichment opportunity or a time to explore a topic in depth.  When students miss this, they often are unable to complete following activities or use the skills or knowledge as the course moves forward.  Periscope not only allows a student to participate in real time, but you can save the link for 24 hours and students can watch the lesson the following day.
Flipping your classroom might seem like a tall order in an otherwise busy school year, but Periscope is an effortless way to bring the world into your classroom or theater.

Here’s what you need to be a Periscope powerhouse:
  • Have a Twitter account that you use for school purposes
  • Download Periscope and link it to your Twitter
  • Let your students and colleagues know – send out the link
  • Video your presentation in Periscope
  • Send out a reminder that the link is live for 24 hours
Kim's note: We will follow up with a blog post soon that explains the technical "How To" of using Periscope as well as some of our experiences from Periscoping Rita's event.  Stay tuned!

Tuesday, February 9, 2016

Teaming on Tuesdays #2: Student Presentations Made Easy!

By The Collab Lab Team

Today was our second Teaming on Tuesday of the Second Semester.  Our Teaming on Tuesdays offer staff an opportunity to participate in a short professional learning experiences, as short as ten minutes, that usually involves a brief visit to a classroom to see a strategy in action, followed by collaboration time in the Collab Lab to brainstorm applications in our own classroom and/or "play" with the apps.

The American Literature team invited us to observe their students doing presentations with Adobe Voice. Students projected their creation through Apple TV, but also gave an introduction in person and shared their presentation with their teacher digitally--mainly through a Media Album on Schoology. Much like ShowMe, Adobe Voice allows students to include images and text, then record their voice in the same slide. One advantage of Adobe Voice is that if a student makes a mistake, he or she can re-record one slide without having to record the entire presentation again.

When we returned to the Collab Lab, we brainstormed possible applications of Adobe Voice. In addition to presentations, one idea that emerged was to have students summarize the day's lesson in Adobe Voice as an exit slip. They could add one slide a day so that they have a review activity by the end of the week. We also discussed how students could create their own review videos to share with class--a type of podcasting, for example.  Other teachers liked the idea of having students take their own photographs around where they live and to create their own "About Me" presentations for their foreign language classes.  If you have more ideas and/or examples, please share them with us as the year goes on.

Here are some more examples of some of the American Literature students' projects!
1.  Mahatma Gandhi
2.  Dennis Rodman
3.  Lorde

Monday, February 1, 2016

Easier Presentations for All Subjects with Adobe Voice

By Kim Miklusak

I was first introduced to Adobe Voice through pre-service teachers who raved about the app, citing that it was so easy that kindergartners could use it!  I hadn't had an opportunity to try it out in class until this week when our American Literature class began preparing for our oral communications unit on a real-life nonconformist after having read Sula by Toni Morrison.  This will be part 1 of a blog; next week I will share out student samples and provide more feedback.

I cannot stress how simple Adobe Voice is for any subject or grade!  It's the best of a few apps all in one.  Also, it's free, which is always helpful.  The app first allows you to name your presentation and select a template if you want one.  All this does is set up key words for certain slides.  You are welcome to change, add, or delete slides to meet your goal.


There are several simple and pre-made template for backgrounds and slide transitions as well as layout design.  The downside (or upside) of this is that you cannot design these slides as you want.   You can also select music--which I wouldn't suggest if you have students speaking over it.  If you are not speaking in the presentation, you can set how long you want each slide to play for.  Otherwise the slide stays on the screen for as long as you talk.

When you want to add a photo, you are given a few choices including from your camera roll, taking a picture, or searching.  All of the search options are copyright safe!  This is a huge digital citizenship teachable moment for students.  One thing I noticed, however, is that there is not always a huge amount of photos.  I found more available for reuse through Google; I simply saved them to my camera roll.


After the presentation is done, students can record their voice if they would like.  This is the easiest option ever.  You simply hold down the record button and speak.  If you would like to record over what you just said, you just press the button again!  This is a huge bonus over other similar apps in that you don't have to re-record your entire presentation if you mess up on one slide.  The down side in comparison to some other apps, however, is that you cannot write or draw on any of the slides, which may not be a problem depending on why you are using it.


When you're ready to share, it's as easy as ever.  Among the options are emailing a link or tweeting.  For example, here is a link to the sample I made to share with my team and students.  However, the option I'm most appreciative of is the ability to save it to the camera roll because then I can upload it and have students upload them to a Schoology Media Album to share!  Now every student in class can provide feedback on all of the presentations.

I will post again next week with student samples and more feedback. 
Tuesday, October 27, 2015

Peer Observation: Round 2 (Post 1/4)

Period 1
The second Peer Observation Day got off to a great start in Kristen Guth's freshman english class. Students were self-assessing on their speeches about a person who had a positive impact on their lives. Kristen recorded students' speeches on her iPad and was able to share the speeches with each  student through Google Drive. Students were then able to watch themselves and assess their speaking skills - rating themselves on volume, eye contact, posture, clarity, and preparation using a rubric.

 The self-assessment rubric also left room for students to provide examples or evidence for their rankings.

This outside perspective let students see themselves in a more objective manner, which presented a chance for them to see strengths and areas that may need improvement.  It was great seeing students self reflect in other subject areas and I have plenty of ideas for my classroom as a result. Thank you Kristen for letting us observe your classroom!


Period 2
A big Thank You to Tim Phillips and Beata Yormark for inviting us into their classrooms during 2nd period for our second Peer Observation Day. In Human Geography, we saw students engaging with the lesson by participating in a Schoology discussion about voluntary migration. It was a great way to get students to connect the concept to their own lives. It was particularly fun to watch Mr. Phillips' students explaining Schoology discussions to observing staff members. 

In Beata's math class, students were reviewing for a unit test by completing a Schoology checklist. It was empowering to see students all engaged and working at their own pace to review the material. We saw kids collaborating to review the material, asking good questions, and all advancing toward their learning goals. Students explained to observing staff members the importance of showing their work as they completed tasks in Notability. They truly took ownership of their learning.

We loved having Mary Beth Khoury and Marge Wojtas join us for our second Peer Observation Day. We hope others find the time to join us next time, too!

Friday, October 23, 2015

Using Audio Recording to Improve Fluency

By Bonnie Kale

In a high school English classroom, we rarely have the opportunity to practice and assess our students' reading fluency.  After all, with the time constraints of a 50-minute classroom, it would be nearly impossible to give 25 students a chance to read aloud from a text.  What's more, we don't want to force kids to read a passage aloud in front of their peers when they have had limited time to practice. Now, thanks to the audio feature on Schoology, it is easy to seamlessly incorporate fluency instruction and assessment into our courses.  Simply create an assignment as you regularly would in Schoology.  When students go to submit the assignment, they will click on "submit audio recording." 
 

Recently, I had the opportunity to use this audio feature with my honors freshman class. Students practiced reading the prologue from Shakespeare's Romeo and Juliet in small groups, paying particular attention to the punctuation, phrasing, rhyme, and overall purpose of the passage.  Then, students went home and submitted an audio recording of themselves reading the prologue aloud.  I was able to provide students with individual feedback about how to improve their fluency, thus, enhancing their overall understanding of the passage.  For example, I could hear that several students were pausing and ending phrases at the end of the line, rather than continuing the phrase to the end of the punctuation.   It's easy to forget that fluent reading is not a product of good reading but a contributor to reading comprehension.


Friday, February 27, 2015

Schoology Media Folders across subjects

By Kim Miklusak

This is a follow-up to Linda Ashida's post about Using Videos to Transform Learning

This week my students worked with Schoology's media folders for the first time.  The students have watched and annotated Martin Luther King Jr.'s "Other Ameica" speech and then read and annotated Arnold Kling's "Libertarianism and Poverty" article.  We did other activities with both texts; the culminating project was to put the authors in conversation with each other.  What would MLK agree/disagree/qualify with Kling or vice versa?  Instead of doing this as a written paragraph as we had done in the past for similar assignments, the students recorded themselves presenting their argument using their Camera Roll.  They then posted the video in a media folder in Schoology.  Finally, their partner watched the video and responded in the comments--first paraphrasing the argument and then evaluating it.

I was originally inspired by this when I went to observe Kirsten Fletcher's AP French students work with media folders to make commercials and practice verb tenses.  I like a few things about media folders: first, the students have an authentic audience.  While I didn't require them to record their faces, the fact that their voices were on there somehow made it more real to them.  They could hear what they would normally write.  I think students revised what they were going to say more times than they would normally have done in their writing!  I also liked that it was completely controlled by them.  I did not have to handle any of the uploading.  This helps students continue to take ownership of their learning.  When they were both done, I was able to go in and give my own feedback to both partners.

I can see many uses for media folders across so many subjects: recording speeches, practicing foreign language, giving presentations, performing science labs/experiments, or even just explaining their thought processes for an article or a math/science problem.  Do you have other suggestions?  Leave them in the comments below!